The Huawei MatePad Pro 12.2 is a feature-rich tablet built for productivity and seamless multitasking. For many users, accessing Gmail is essential for work, study, and daily communication. Since the device runs HarmonyOS without Google Play, installing Gmail requires a slightly different method, but Huawei now provides an easy and secure way to do it. Once you understand the steps, setting up Gmail becomes quick and straightforward. Below, you’ll find a complete guide to help you add the Gmail app to your new MatePad Pro 12.2.

Here are the most reliable ways to install and use Gmail on the MatePad Pro 12.2. The first method is the recommended option for most users because it delivers the simplest and most secure setup.
Before exploring alternative methods, let’s walk through the direct AppGallery method step by step, as it provides the smoothest gmail app for huawei tablet experience.
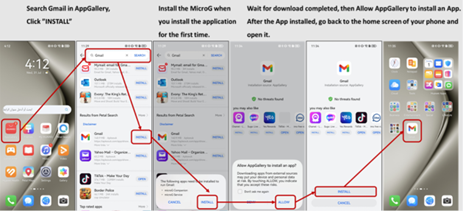
Step 1: Open Huawei AppGallery
Unlock your MatePad Pro 12.2 and open the AppGallery app from the home screen. AppGallery is Huawei’s official app store and the safest place to download Gmail.
Step 2: Search for “Gmail”
Tap the search bar at the top, type Gmail, and wait for the results to appear. You should see the Gmail app listed as an AppGallery-supported installation.
Step 3: Tap “Install”
Press the Install button. AppGallery will begin preparing the installation and may prompt you to download additional support components.
Step 4: Install MicroG When Prompted
Since Huawei devices do not use Google Mobile Services, AppGallery will automatically ask you to install MicroG.
Tap Install to allow the system to download and configure MicroG.
MicroG enables secure Google login, syncing, and notification support—making Gmail behave just like it does on Android devices with Google Play.
Step 5: Wait for Installation to Complete
After downloading Gmail and MicroG, wait until you see the confirmation message. Do not close AppGallery during this process.
Step 6: Open Gmail From the Home Screen
Once installed, return to your home screen and look for the Gmail icon.
Tap it to launch the app.
Step 7: Sign in to Your Google Account
Enter your Gmail address and password, then follow the prompts.
After signing in, Gmail will begin syncing your emails automatically.
Step 8: Enable Notifications for Gmail
Go to:
Settings → Apps → Gmail → Notifications → Allow all
Then go to:
Settings → Battery → App Launch → Gmail → Manage manually → Enable all switches
With these steps, Gmail will run smoothly on your MatePad Pro, offering full access to inboxes, attachments, labels, and Google account syncing.

If Gmail does not appear in AppGallery, you can download the APK from secure sources like APKMirror, APKPure, or Uptodown. Install the APK normally and allow permissions. While this method works, it requires manual updates and may need MicroG for full functionality.
Some Gmail versions need MicroG support. Download the MicroG package from a trusted site, install it, and grant all required permissions. This ensures Gmail can handle sign-ins and push notifications correctly.
For users who want a simple option without installing extra components, the built-in Email app can sync Gmail via IMAP or POP. This provides basic email access with notifications, though not every Gmail feature is available.
Adding Gmail to your Huawei MatePad Pro 12.2 is simple when following the right steps. The AppGallery + MicroG method offers the most seamless experience, supporting full Gmail functionality, notifications, and account syncing. Alternative methods, such as using APK files or the Huawei Email app, are also effective when needed. With proper installation and notification settings in place, your MatePad Pro becomes a reliable tool for managing your inbox, staying organized, and handling communication effortlessly.